
I grew up watching football at a time when 4-4-2 was the standard across Scottish and English football. Beckham and Giggs on the flanks, Keane and Scholes centrally and Yorke and Cole up top are my most vivid memories of the formation. Even now, on terraces across Scottish football you'll still hear some rage when teams aren't playing "two up top".
The rise of 4-2-3-1 and Barca's 4-3-3 saw the use of 4-4-2 fall away in-game, certainly for me anyway, and in the non-FM world too. However, in recent years, it's had a bit of a revival. I don't need to go on about Leicester's that won them the Premier League, but it was interesting to see Monaco using a version to great effect on their way to pipping PSG to the French league title and progressing in the Champions League. I've always had the thought in the back of my mind to get a 4-4-2 set up on FM again and working the way I want it to. Strong in defence, a creative midfield that's able to support a front two that work in harmony together. More importantly though, I want it to be simple.
With all tactical posts on this site there's a disclaimer. When I've found success with a tactic over the last couple of editions of the game, it's been purely by accident. I'm not a tactical expert, so if you're looking for a pro talking about pro things, you might want to head elsewhere just now. If you're like me and feel like you're more of an amateur talking about amateur things, read on!
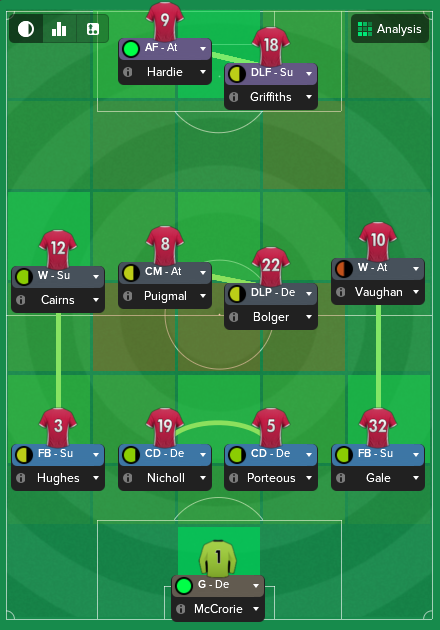
Formation, Roles and Player Instructions
Defence

Nothing fancy here. My defence is tasked with defending first and foremost.
My keeper has a few specific instructions. Passing it shorter, taking short kicks and playing it out to my full backs, plus playing less risky passes too. We aren't a team that wants possession for possession's sake, but I like to keep the ball and play it out from the back. Simply put, if we've got the ball the opposition have less of a chance of scoring. My central defenders aren't asked to do anything extra at all. Just defend. Intercept, win the ball, head it clear, get opposition crosses into row Z. They aren't the most gifted so when the ball is at their feet, it's a bit of a worry. That's why my keeper plays it out wide to my full backs.
Those full backs are set to be on support. Anything more than this, and I feel they'll get dragged way out of position, leaving us wide open. When we've got the ball, they'll support the attacks from deep and provide an outlet for us to keep possession and be patient. I ask them both to cross more often too. We've got two up top so when the opportunity arises I'm happy for them to try and swing the ball into the box.
Midfield

Continuing on the defensive theme I've gone for a DLP, or as I've renamed it, my Deep Lying Destroyer (DLD). No changes to the set DLP role here, so why pick this role instead of a central midfielder with a defend duty? Positioning on the pitch and that hardcoded player instruction of closes down more, that's why. The DLP shoots less often and holds position, in comparison. That hold position instruction versus the increased closing down for a CM(D) is vital to how I want my DLD to play. A DLP is primarily a creator, but I'm happiest when my DLD is shielding the back four and enabling my remaining five players to have a bit more freedom to create and attack.
The one neutral role in the side is my left winger on support. I don't expect him to bomb down the wing, he'll support the attacking play when we've got the ball going forward but he mainly acts as cover on that side for the central midfielder alongside him to attack.
When we discussed it on the pod, I said my CM with an attack duty could be classed as a number 10 for me. He creates chances from deep and gets up to support the strikers. He seems to ghost into the box undetected at times, getting on the end of quite a few of those crosses from the attacking winger. His role is to attack opposition left backs and get crosses into the box for our front men. He also finds himself getting on the end of a fair few chances from my deep lying forward dropping in to create space.
Attack
I ultimately chose my DLF on support as my main number 10 though. He drops in and creates havoc for opposition defences. Do they follow him? Should they sit in? Panic stations. It's even more prevalent as he's instructed to roam from his position and move into channels. Alongside the advanced forward also moving into channels, we've always got that wide out ball, dragging defences all over the place. There's some lovely interplay between the front two and the winger on the right, at times forming a three man attack almost.
Relationships
This was a new introduction for FM18, and I believe it's a positive one.
Here's how my first choice side shapes up in this respect. There's connections all over the pitch. Some don't pay much attention to the morale side of the game and can still find success. That's fine, good on them.
If we're talking marginal gains though, doing everything possible to add that little bit of extra chance of winning a football match, then the players having a great understanding amongst each other (team cohesion training for the first three months of the season helps, along with pre-match teamwork training), being encouraged (talked up in press conferences, individually spoken to when they've played a blinder or won an award) and feeling like they'll run through brick walls for their manager (keeping a core together for a good few seasons and checking how well you're supported by the players on the dynamics tab) goes a long way to turning a draw or defeat into a win.
Team Instructions

I said I wanted to keep it simple. My base tactic has no set team instructions and no changes to the mentality or shape. I've seen numerous examples of tactics with a whole boatload of instructions, pretty much every option available being activated in some way. It doesn't need to be like that. Picking all the team instructions under the sun isn't a prerequisite to winning on FM. Sure, you certainly might want your team to play high tempo, direct football, with a high line and closing down opposition players to the max. Pick those instructions in those cases, if you've got the players to play that way. I like to let my players decide when to play it short or long or when to close down and when to not. Their chosen roles and individual attributes do a lot of the work here, negating my need to add numerous team instructions.
A couple of tweaks I occasionally like to make are shifting the shape to structured and telling the players to dribble less. I've got to admit that shape on FM still does confuse me slightly no matter how much I read about it. However, I take it as structured means that our players will just focus on their key roles that little bit more, so the defenders will become even less concerned with getting forward, while the attacking players will look get forward that little bit more.
We aren't blessed with the best dribblers in the world. There's no players that'll run rings round opponents, so by telling them to dribble less it gets them passing the ball that little bit more rather than potentially running into trouble and losing the ball.
Match Action
At The Back
My DLD is probably my favourite aspect of my defensive play. The players I rotate between in this role aren't necessarily the most adept at passing, or even tackling. They are both incredibly hard working, determined and aggressive though, plus have speed and stamina in abundance too. All of those qualities make them ideal for the role I want this player to play. Shielding the back four, intercepting the ball and laying it off to our more dangerous offensive players. In a 4-0 away win at Easter Road against Hibs, Aaron Bolger, who's my main choice for the role, played perfectly.
While his tackling attribute isn't up there with the best, it doesn't mean he doesn't get stuck in about our opposition.
Hibs' AMC manages to get round him here, but Bolger's work rate sees him get back in and make a decisive tackle on the next phase of the attack, as Romulo looks like he could lay it back to Talysson to get a shot away. One of my CB's aside, the DLD make the highest number of tackles, with Bolger ending up third in the league for tackles per match, but with much more minutes played that both first and second place. Both CB's aside, Bolger made the most interceptions in this Hibs match and comparing his interceptions total with midfielders from our league rivals, was up there near the top for the season.
Going Forward
When we're attacking it's all about the four forces of my CM(A), W(A), DLF(S) and AF, or as they've been over the last couple of seasons, Puigmal, Vaughan, #Rog and Hardie.

This equaliser against Rangers is a great example of the four roles in action. #19 is my CB winning the ball from the Rangers keepers goal kick. #9 is my DLF, Hardie in this instance, dropping deep to collect the second ball. Bolger, #23, does his primary role by showing for the pass and laying it inside to Puigmal, #8. Hardie's received the ball again and plays a defence splitting pass to the AF, #17, who finds himself through on goal. Remarkably, he doesn't shoot and has spotted the run of Vaughan, #10, my attacking winger who I said gets up to form a three pronged attack at times. He finishes into an empty net and ended up scoring 18 over the course of this season, with 12 man of the match awards under his belt too.
If you've read my last two season update posts (season five and six), you'll know that #Rog and Hardie love a goal. The deadly duo scored 124 goals between them over those two seasons, firing us to consecutive Europa League group campaigns when we had no right to even qualify. If they're given an inch of the space in the opposition penalty area, it usually leads to a Stirling goal. With two men up top, I said I was more than happy to fire crosses into the danger area, it's a big part of our play.
Hardie struggled with a couple of injuries this season which kept him out for months at a time. It took #Rog a little while to adjust to playing with Arsenal loanee newgen, Will Sealy, but they combined to devastating effect for this goal. It was #Rog's second on his way to hattrick away at Dynamo Kiev in the Europa League group stage.
It's a great example of the DLF's extra player instructions of roaming more and moving into channels. Sealy peels wide, dragging a Dynamo CB with him, Vaughan finding him down the right. #Rog's movement in the box is brilliant, coming across the other CB and leaving him and the RB for dead. Simple, effective, deadly. Notice Puigmal, #8, arriving late into the box as the central midfielder on attack too. I could watch goals like this all day.
Summary
The thing to bear in mind when reading anything tactical is that usually the author has moulded their recruitment around that tactic and has integrated it to the point where the players are at one with it, so they definitely shouldn't be classed as something you can plug in to your side on FM and instantly win.
However, since moving to this tactic we've gone from a team that only just stayed clear of relegation in our first season in the top tier of Scottish football, to one that's consistently punching above it's weight by qualifying for European football in each of the three seasons since, culminating in pipping Rangers to finish second behind Celtic in my most recent season to qualify for the Champions League for the first time.